How to Test Electrical Grounding: Safe & Effective Methods. In today’s article, homesafetools.com will explore with you in the most detailed and complete way. See now!
afe and Effective Methods for Testing Your Home’s Electrical Grounding
Electrical safety is paramount in any home. A properly functioning grounding system is your first line of defense against dangerous electrical shocks and fires. Before we dive into the how-to, it’s crucial to emphasize safety. Always switch off the power at the breaker box before working with any electrical components. Furthermore, wearing insulated gloves and safety glasses is non-negotiable. If you are uncomfortable at any point, call a qualified electrician – your safety is worth it!
Now, let’s discuss the methods for testing your electrical grounding. There are several ways to approach this; however, we’ll focus on two primary methods that provide different levels of detail and accuracy. The first involves using a grounding clamp meter, a tool that directly measures the ground resistance. This method provides the most accurate assessment of your grounding system. The second employs a multimeter, a more readily available tool, which can provide a basic check. Finally, a visual inspection is always a good starting point before using any testing equipment.
Using a Grounding Clamp Meter for Accurate Ground Resistance Measurement
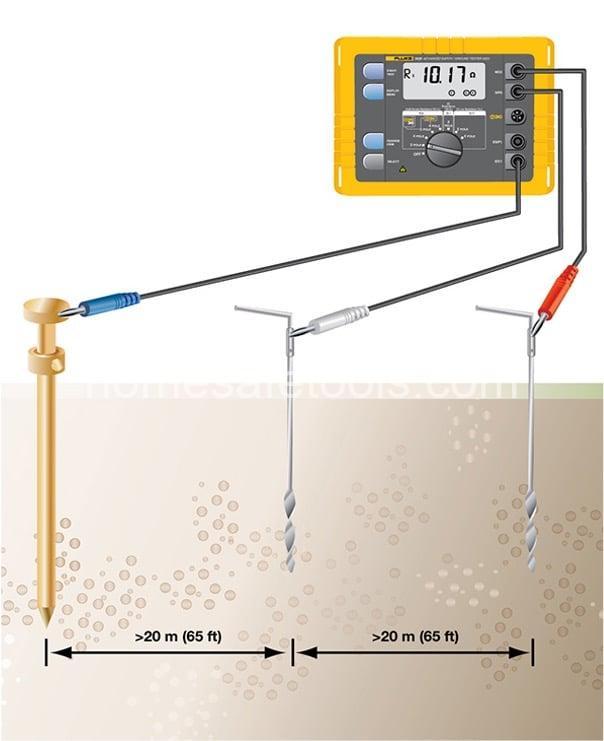
A grounding clamp meter is your go-to for precise ground resistance measurement. It directly measures the resistance between the ground rod and the earth, giving you a clear picture of your grounding system’s effectiveness.
First, ensure power is completely shut off to the circuit you’re testing. Then, identify your grounding rod (usually located outside near your electrical panel). Next, carefully clamp the meter around the grounding rod. Most meters have clear instructions, but generally, you’ll connect the meter’s leads according to the manufacturer’s guidelines. After connecting, take the reading. The meter will display the ground resistance in ohms.
Now, how do you interpret the results? Lower resistance values (typically below 5 ohms) are generally considered acceptable. Higher resistance suggests problems that need addressing. High resistance might indicate corrosion on the grounding rod or connections, a loose connection, or insufficient grounding rod depth.
However, the use of a grounding clamp meter isn’t always easy. These meters can be expensive, and their operation requires a certain level of technical understanding. Therefore, while it’s the most accurate method, it may not be feasible for everyone.
Testing Grounding with a Multimeter: A Simpler Approach
A multimeter offers a simpler, more accessible method for checking grounding. Although less precise than a clamp meter, it can still detect significant grounding problems. This method involves measuring the voltage between the ground and neutral wires. Again, always ensure the power is off before starting.
Set your multimeter to measure AC voltage. Carefully connect one probe to the ground wire and the other to the neutral wire. A low voltage reading (ideally close to zero) indicates a good ground. A significantly higher reading signals a potential problem.
Bear in mind; this method is only a preliminary check. A low reading doesn’t guarantee perfect grounding, and a high reading is a definite cause for concern, indicating you need further investigation with a grounding clamp meter.
Visual Inspection: Identifying Potential Grounding Problems
Before using any sophisticated equipment, a quick visual inspection can sometimes reveal obvious problems. Look for signs of corrosion on your grounding wires, loose connections, or any physical damage to the wires or grounding rod itself. A thorough inspection can often prevent more serious issues from developing. Pay close attention to the grounding wire’s connections at both the electrical panel and the grounding rod, checking for any signs of wear and tear.
Understanding Grounding Resistance Values and Troubleshooting High Resistance
Acceptable grounding resistance values depend on factors like soil type, ground rod length and diameter, and local electrical codes. Consult your local building codes or a qualified electrician to determine the acceptable range for your situation. If you find high resistance, it often means there’s a problem in the grounding pathway.
Common causes of high resistance include:
- Corrosion: Over time, moisture and chemicals in the soil can cause corrosion on the grounding rod and wire connections, increasing resistance. Cleaning or replacing corroded components is crucial.
- Loose Connections: Loose connections at any point in the grounding path significantly increase resistance. Tightening loose screws and ensuring solid connections are vital.
- Insufficient Ground Rod Depth: A grounding rod that isn’t deep enough in the ground might not provide effective grounding, especially in dry or rocky soil. Adding more grounding rods or extending the existing one is needed.
Remember, tackling these issues yourself if you lack the expertise can be hazardous. If you’re uncertain about making any repairs, always call a qualified electrician.
Choosing the Right Grounding Testing Equipment and Resources
Several different tools exist, ranging from simple multimeters to advanced grounding clamp meters. The choice depends on the level of accuracy you need. Multimeters are more affordable and accessible, suitable for quick checks, while grounding clamp meters offer precise measurements for more in-depth analysis. For more information on grounding standards and best practices, consult your local electrical codes and reputable sources online.
Maintaining Your Electrical Grounding System for Long-Term Safety
Regular inspections are crucial for maintaining a safe electrical system. Visual checks every few months, combined with more thorough testing (using a clamp meter or multimeter) at least once a year, will ensure the longevity and effectiveness of your grounding system. Addressing any issues promptly prevents serious problems from developing. This simple precaution safeguards your family and home.
Remember to always prioritize safety. If you are unsure about any part of the process, call a qualified electrician.
FAQs about How to Test Electrical Grounding?
What are the acceptable grounding resistance values?
Acceptable grounding resistance values vary significantly depending on several factors including local codes, soil conductivity, and the size of the grounding electrode system. Generally, lower resistance is better, aiming for values below 5 ohms in residential settings. However, consulting the local electrical codes is crucial, as values can vary greatly.
What should I do if my grounding resistance is high?
High grounding resistance indicates a problem. First, repeat the test to ensure accuracy. If still high, carefully visually inspect all grounding connections and the grounding rod itself, looking for corrosion, loose connections, or damage. If you find any issues, address them appropriately (clean corrosion, tighten connections). However, if you’re not comfortable, contact a qualified electrician. They possess the expertise to properly diagnose and solve the issue safely.
How often should I test my electrical grounding system?
Frequency depends on your location and the local electrical code. Annual testing is a reasonable minimum, especially if your area is prone to severe weather. However, visual inspections are highly recommended several times per year.
Can I test grounding myself, or should I hire a professional?
While you can perform basic grounding tests using a multimeter or even a visual inspection, any issues should always be checked by a professional if you aren’t confident in your skills or understanding. Improperly addressing electrical issues can be extremely dangerous, potentially causing damage and even injury.
What are the risks of improper grounding?
Improper grounding carries significant risks, primarily electrical shocks and the potential for fire. Faulty grounding can lead to dangerously high voltages on metal appliances and fixtures, causing shocks and even electrocution. Furthermore, improper grounding can increase the risk of electrical fires due to inadequate fault current paths.
Conclusion
Understanding how to test your electrical grounding is a vital step in ensuring home safety. John Amrry hopes this guide from homesafetools.com empowers you to prioritize electrical safety in your home. Leave your comments, share this article, and check out more home safety tips at https://homesafetools.com!